Sunday, July 29, 2007
Thanks to my coworker Amanda for a great project idea - we spent some time discussing designs last week, and settled on a decidedly low-tech design for a high tech product. I also wanted the case to clearly say "phone", not iPod.
I used a 3.5 mm hook and worsted weight yarn. The entire pattern is worked in single crochet. Follow the grid below to create the pattern, then sew the bottom and side seams.


I'm frankly surprised I'm not seeing more yet. There are oodles of iPod covers out there (tip: the iPhone is the same width as the Video iPod, but slightly taller), but there aren't many contributions for the new product. I'll post my design later today. Here's a sampling of some of the best options out there.
1. Daddy Types Handknit iPhone
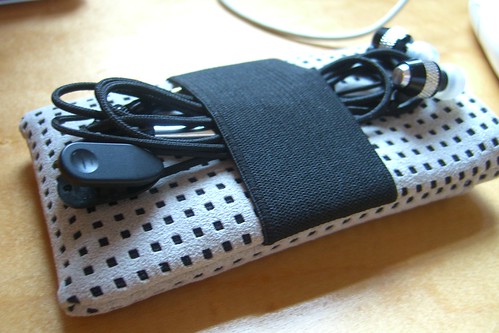
2. Wrappers iPhone Case
3. Pink Poodle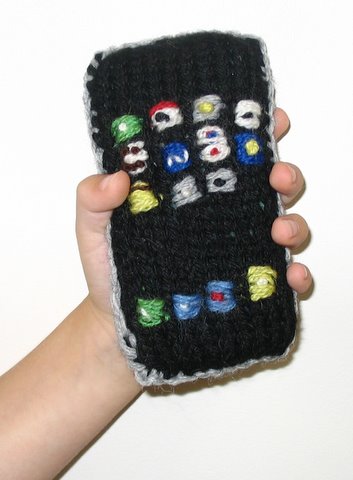

Sunday, July 22, 2007
I saw a post on crochetville recently for a crocheted cat toy. That in and of itself isn't all that interesting (except, really? Why not buy a toy for a dollar, or better yet, throw a ball of string at your cat), but the post also mentioned it was for a crocheted cat toy exchange group. It blows my mind that such things exist. I love seeing all these yarn swaps, but this is just going too far.
I am not a member of any such clubs yet (and am actively avoiding anything that will pigeonhole me in the "crazy cat lady" genre), but I do bookmark themes avidly. Food seems to be a big one lately. "Melbangel" has a spectacular food set on Flickr (as well as people and animal sets) that includes these avocado and scoops of ice cream.
 "Benicetomice" personifies her food, like this TV dinner I'd be afraid to eat. She's got a wonderful hot dog design too.

This is a quick project - less than three hours start to finish. I used the "Boy Beanie" pattern from The Happy Hooker, swapping in an H hook for the recommended I. Size-wise, it's perfect for a 2-3 year old. I doubt the recommended hook size would actually fit an adult. Save the pattern for kids.
Sunday, July 15, 2007
 I have a new trick for grouping multiple images: Mosaic Maker. It's fast and easy tool. And if you're interested in cataloging and grouping in general, this article from Evil Mad Scientist Labs is worth a read.
I'm finding more and more crocheted clothing and accessories out there - the trend definitely isn't dying. Clockwise from upper left:
- Dress from baby gap
- Crocheted clutch from Banana Republic
- Dress from Forever 21
- Top and blanket from Free People
- Bikini from Free People
- Cardigan from Free People
- Top from Forever 21
- Dress from Forever 21
Did you catch The Knitting Circle Shows Its Chic article in the NYTimes last week? It's definitely worth a read. I particularly like this acknowledgment of the power of craft bloggers:
“I do think the runways were inspired by people doing crafty things at home and by how inventive this generation is,” said Ruth Sullivan, an editor at Workman Publishing, which publishes large numbers of crafts books. She added that designers may also be looking at the Internet, where rafts of people are designing their own patterns and posting them on blogs."
Thursday, July 05, 2007


It was love at first sight when I spotted Fia Lotta Jansson's top tutorial (thanks Craft Mag for the link). Fashion-forward, crocheted, obviously fairly simple...a perfect weekend project. The tutorial isn't actually that helpful, though - she repurposed "lace trim" for the crochet portion. It also doesn't address how the strapless top stays up, or how you get it on. For all of you crafters out there, here's a complete pattern.
Crocheted top:
Starting chain: multiple of 10 sts + 2
(Mine was 172 chs using a 3.5mm hook and baby weight yarn. Make a chain and wrap it around under your arms to determine your chain length - it should be an inch or two longer than your actual measurement. )
Row 1: Work 1 sc into 2nd ch from hook, 1 sc into each ch to end, turn.
Row 2: Ch 3 (counts as 1 dc), ship 1 sc, 1 dc into each of next 3 sc, *ch 3, skip 3 sc, 1 dc into each of next 7 sc; rep from * to end, omitting 3 dc at end of last rep, turn.
Row 3: Ch 1, 1 sc into each of 1st 4 dc, 3 sc into next 3-ch-sp, *1 sc into each of next 7 dc, 3 sc into next 3-ch-sp; rep from * to last 4 dc, 1 sc into each of next 3 dc, 1 sc into 3rd st of ch 3 at beginning of previous row, turn.
Row 4: Ch 1, sc into 1st sc, skip 2 sc, 1 sc into next sc, ch 6, skip 3 sc, 1 sc into next sc, * ch 5, skip 5 sc, 1 sc into next sc, ch 6, skip 3 sc, 1 sc into next sc; rep from * to last 3 sc, ch 2, 1 scinto last sc, turn.
Row 5: Ch 1, sc into 1st sc, 12 dc into 6ch arch, * 1 sc over next 5 ch sp into center st below (from row 3), 12 dc into next 6ch arch; rep from * to last ch 2 sp, 1 sc into last sc, pause.
Take a break and wrap the piece around you again. Work several rows of single crochet along the short edge (as many as you need for a comfortable fit), ending with a button hole. Use pins to mark where shoulder straps should be placed. Turn.
Row 6: Sc across entire top. At marked shoulder strap locations, work 6 sc up first half of arch, ch 75, sc back down ch, and continue working sc along your path. Fasten off. Sew button at opposite end of button hole.
Be sure to not sew your button hole tab to the tshirt portion to allow a little extra wiggle room when putting this on. Knot your shoulder straps. You're done!
Sunday, July 01, 2007

I finished the blanket last night. It turned out beautifully - the worsted weight yarn creates a very different looking pattern, almost floral in appearance (you can see Poppalina's original and the pattern here). I kept the border simple, just a series of single crochet rounds. I've decided to not give it as a baby gift after all - it will make a nice reading blanket/couch throw for an adult.
All told, this project took about 3 weeks. The pattern is varied enough to not get tedious, and it's a great way to use up leftover yarn.
Next up: a couple of hats for charity and a felted pillow case for my living room.
